
LevelDB의 전체 코드엔 약 100개 가량의 메인 함수가 존재한다.
여기서 db_bench의 makefile을 확인해 보면 db_bench의 메인 함수는
db_bench.cc 파일에 존재함을 알 수 있다.

해당 메인 함수는 크게 2개의 파트로 구성되는데,
첫번째는 db_bench를 실행할때 bloom_bits, num과 같은 파라미터를 읽어들이는 sscanf 파트,
그리고 benchmark.Run()이란 클래스 함수 두 파트로 구성된다.

benchmark.Run()도 크게 3가지 파트로 나눌 수 있는데,

벤치마크 클래스에서 filter policy를 포함한 여러 클래스 변수들이 선언되며

이후 클래스 생성자에서 클래스 변수들의 값을 할당한다.
이때 filter policy는 메인함수에서 sscanf로 읽은 bloom_bits 값이 0 이상이면
블룸 필터를 사용한다는 것이니 NewBloomFilterPolicy() 함수를 호출하고,
아닐 경우엔 블룸 필터를 사용하지 않는다는 것이니 Null을 리턴한다.
(bloom_bits의 디폴트 값은 -1로, 값을 변경하지 않으면 블룸 필터를 사용하지 않으며
0으로 지정한다면 최소한의 크기의 블룸 필터를 사용하게 된다.)

그 다음 Run() 클래스 함수는 크게 3가지 부분으로 나뉘게 되는데,

PrintHeader()는 db_bench를 돌리는 환경이나 데이터의 정보를 터미널에 출력해주는 함수,
그리고 Open()은 write 과정을, RunBenchmark()는 Read 과정을 처리하는 함수이다.

그 중 Open() 함수에선
filterpolicy를 포함한 클래스 변수값들을 options이란 새로운 Struct에 담아 DB::Open() 함수로 전달,
DB::Open() 함수도 인자로 받은 options의 값들을 impl이란 클래스에 넣고 MaybeScheduleCompaction() 함수를 수행하는 등,
filterpolicy를 포함한 변수값들을 다음 함수로 계속 전달하는 과정을 반복한다.

그 다음 코드 흐름은 위와 같은데,
위 코드 흐름은 Compaction을 진행하고 FilterBlock을 포함한 SSTable들을 생성하는 과정으로
해당 과정에서 filterpolicy는 이전 함수에서 다음 함수로 값을 전달 받기만 하므로 자세한 설명은 생략한다.

이후 마지막 GenerateFilter() 함수에서
지금까지 전달해온 filterpolicy의 createFilter 클래스 함수를 호출하게 되는데,

해당 함수의 내용은 벤치마크 클래스 생성자에서 호출한 NewBloomFilterPolicy() 함수에 의해 결정된다.
Bloom Filter Policy

NewBloomFilterPolicy()는 “FilterPolicy” 클래스를 오버라이드한 “BloomFilterPolicy” 클래스를 생성하여 리턴하는 함수인데,

FilterPolicy 클래스의 경우
필터의 이름을 리턴하는 Name() 함수
Write할 때 블룸 필터 배열을 생성하는 CreateFilter() 함수
그리고 Read할 때 배열에 특정 key 값이 존재하는지 확인하는 KeyMayMatch()
3개의 클래스 함수로 구성되어있다.
이를 오버라이드한 BloomFilterPolicy 클래스의 경우

class BloomFilterPolicy : public FilterPolicy {
 public:
  explicit BloomFilterPolicy(int bits_per_key) : bits_per_key_(bits_per_key) {
    // We intentionally round down to reduce probing cost a little bit
    k_ = static_cast<size_t>(bits_per_key * 0.69);  // 0.69 =~ ln(2)
    if (k_ < 1) k_ = 1;
    if (k_ > 30) k_ = 30;
  }

  const char* Name() const override { return "leveldb.BuiltinBloomFilter2"; }
해시 함수의 개수를 정하고 최대 개수를 제한하는 코드 부분과
특정 이름을 리턴하는 Name() 함수
void CreateFilter(const Slice* keys, int n, std::string* dst) const override {
    // Compute bloom filter size (in both bits and bytes)
    size_t bits = n * bits_per_key_;

    // For small n, we can see a very high false positive rate.  Fix it
    // by enforcing a minimum bloom filter length.
    if (bits < 64) bits = 64;

    size_t bytes = (bits + 7) / 8;
    bits = bytes * 8;
그리고 CreateFilter() 함수는 bloom_bits(=bits_per_key)값과 num(=n)값을 곱해
블룸 필터 배열의 크기(=bits)를 정하는 파트와
const size_t init_size = dst->size();
    dst->resize(init_size + bytes, 0);
    dst->push_back(static_cast<char>(k_));  // Remember # of probes in filter
    char* array = &(*dst)[init_size];
    for (int i = 0; i < n; i++) {
      // Use double-hashing to generate a sequence of hash values.
      // See analysis in [Kirsch,Mitzenmacher 2006].
      uint32_t h = BloomHash(keys[i]);
      const uint32_t delta = (h >> 17) | (h << 15);  // Rotate right 17 bits
      for (size_t j = 0; j < k_; j++) {
        const uint32_t bitpos = h % bits;
        array[bitpos / 8] |= (1 << (bitpos % 8));
        h += delta;
      }
    }
“더블 해싱”을 처리하는 파트로 나뉘게 된다.
Double Hashing

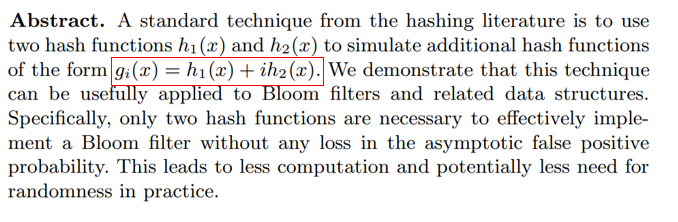
(출처:https://www.eecs.harvard.edu/~michaelm/postscripts/rsa2008.pdf)
해당 함수의 주석에 작성되어 있는 논문을 참고하면,
기존의 k개의 서로 다른 해시 함수를 사용하는 방식 대신
2개의 해시 함수와 그 중에서 하나를 중복 사용하는 “더블 해싱” 방식을 통해
해시 함수로 인한 부하와 연산을 대폭 줄이면서 기존의 성능을 유지할 수 있음을 수학적으로 증명하고있다.
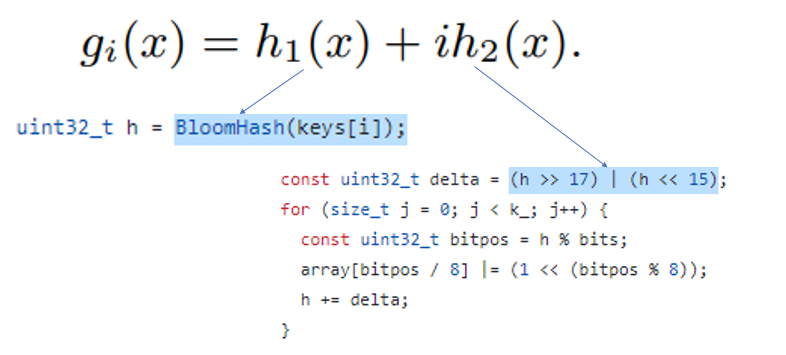
LevelDB에서 첫번째 해시 함수는 BloomHash()란 함수로,
두번째 해시 함수는 ( h>>17 ) | ( h<<15 ) 란 비트 연산으로 구현되어있다.
namespace {
static uint32_t BloomHash(const Slice& key) {
  return Hash(key.data(), key.size(), 0xbc9f1d34);
}
uint32_t Hash(const char* data, size_t n, uint32_t seed) {
  // Similar to murmur hash
  const uint32_t m = 0xc6a4a793;
  const uint32_t r = 24;
  const char* limit = data + n;
  uint32_t h = seed ^ (n * m);
BloomHash는 key 값을 인자로 특정 값을 리턴하는 전형적인 해시함수의 형태를 취하고 있으며,

쉬프트 연산은 앞의 15자리와 뒤의 17자리를 바꾸는 형태로 구성되어있다.
(참고로 해시값은 uint32_t라는 32비트 자료형을 사용한다.)
이러한 쉬프트 연산은 해시 함수의 성질을 만족하면서도
연산에 필요한 overhead가 적어 사용되는 것으로 추정된다.
uint32_t h = BloomHash(key);
    const uint32_t delta = (h >> 17) | (h << 15);  // Rotate right 17 bits
    for (size_t j = 0; j < k; j++) {
      const uint32_t bitpos = h % bits;
      if ((array[bitpos / 8] & (1 << (bitpos % 8))) == 0) return false;
      h += delta;
    }
그리고 특이사항으론 hash 하나당 하나의 bit를 1로 바꿔야 하는데,
블룸 필터 배열은 char 배열로 한 칸의 크기가 1 byte = 8 bits 이므로
배열의 한 칸을 8칸으로 쪼개서 사용하고 있음을 알 수 있다.
 bool KeyMayMatch(const Slice& key, const Slice& bloom_filter) const override {
    // ... 생략
    uint32_t h = BloomHash(key);
    const uint32_t delta = (h >> 17) | (h << 15);  // Rotate right 17 bits
    for (size_t j = 0; j < k; j++) {
      const uint32_t bitpos = h % bits;
      if ((array[bitpos / 8] & (1 << (bitpos % 8))) == 0) return false;
      h += delta;
    }
    return true;
  }
마지막으로 데이터를 Read할때 사용하는 KeyMayMatch 함수의 경우
CreateFilter와 거의 동일한 연산을 사용하나,
if문과 or 대신 and 연산을 사용하여 필터 내부에 특정 key 값이 존재하는지 확인하는 것을 볼 수 있다.